

Last updated September 28, 2026
The reattachment cycle, not the first install
This page is about the ongoing rhythm, not day one. Your very first application is a separate decision, and we cover that on our page comparing a self install to a professional install. Here we are talking about what happens week after week, month after month, once you already own the unit and know it fits.
A reattachment cycle is simple to describe and takes practice to do well. You remove the unit, clean old adhesive off both the base and your scalp, prep the skin, lay fresh tape or glue, and set the unit back in the same position with the same clean hairline every time. The skill is not any single step. It is doing all of them consistently, on your own head, in a mirror, without rushing the parts that matter.
What a home reattachment looks like
Reattaching at home is a real option and a lot of our clients do it. It saves a trip, it fits around your week, and once the routine is muscle memory it is genuinely quick. The trade is that everything rides on your prep and your placement, and the back of your own head is the hardest part to see.
- Remove the unit gently with the right solvent, never by pulling against a stuck edge
- Clean every trace of old adhesive off the base and your scalp so the next bond starts fresh
- Prep the scalp so it is clean, dry, and oil free before anything sticky touches it
- Lay tape or glue in an even, controlled amount, not a heavy overlapping mess
- Set the front first against your natural hairline reference, then press back and around
- Check the perimeter in a hand mirror or a two mirror setup so the back edge is truly down
The skill curve, and how fast it flattens
Nobody is smooth on their first solo reattachment, and that is normal. The early cycles are slow because you are learning to judge how much adhesive is enough, how to hit the same front position without a guide, and how to seat the back edge you cannot fully see. Most men we coach get to a reliable, repeatable result within a handful of cycles.
What separates a clean home reattachment from a frustrating one is almost always prep, not the sticking part. Rushed cleaning, a scalp that is not fully dry, or too much product are behind the large majority of home lifts and short bonds. We teach the routine hands on before we ever expect you to do it alone, and we are a phone call away when something feels off.
Time per cycle, home and studio
At home, a confident reattachment often runs about thirty to sixty minutes once the skill is there, and you do it on your own clock. A studio reattachment takes a scheduled appointment, but that block buys more than a bond. It buys a deep clean of the unit, a proper scalp check, and a trained set of hands on the parts you cannot reach or see.
That difference is why a blended schedule works for so many men. You handle routine reattachments at home to keep the unit fresh between visits, and you come in on a regular cadence for the full service. How often you reattach at all is its own question, and we cover the timing on our page about how often to reattach a hair system.
Failure modes, and how to catch them early
Home reattachment goes wrong in a small number of predictable ways, and every one of them has a fix. Learning to spot the cause is most of the battle. Here are the ones we see, with what is usually behind them.
- Front lifting: adhesive laid too far forward, or a scalp that was not fully dry and oil free at the hairline
- Whole edge releasing early: too little adhesive, old residue never cleaned off, or heavy sweat before the bond fully set
- Unit sitting crooked or too low: front placed without a steady reference point, so each cycle drifts
- Itch or irritation: adhesive left on the scalp between cycles, or skin that never got a rest and a proper clean
- Bumps and ridges under the base: old glue built up because removal cleaning was rushed
What a professional reattachment catches
The value of a studio reattachment is not that we glue better. It is what we notice while the unit is off. With the base clean and your scalp bare, we can see irritation starting, adhesive residue you have been building up, a base edge that is beginning to wear, and hairline drift you stopped noticing because it crept in slowly.
We also reset the baseline. A full clean strips accumulated product that quietly shortens your home bonds, we check the base for early wear so a small repair happens before it becomes a replacement, and we re establish the exact front position so your next few home reattachments have a clean reference to copy. That maintenance visit is worth walking through on its own, and we do on our page about what to expect at a maintenance appointment.
How we set your rhythm
We do not push everyone toward doing it themselves, and we do not insist everyone comes in for every reattachment either. We match the plan to you. If you are hands on, have steady technique, and want independence, we coach you until home reattachment is genuinely reliable and set a studio cadence for the deep work. If you would rather not touch it, we make the studio the default and keep your visits on schedule.
Either way the goal is the same. A bond you trust, a hairline that stays put, and a scalp that stays healthy. We build that plan with you at Peoria, AZ and Eighty Four, PA, and we adjust it as your skill, your skin, and your unit change over time.
Real work
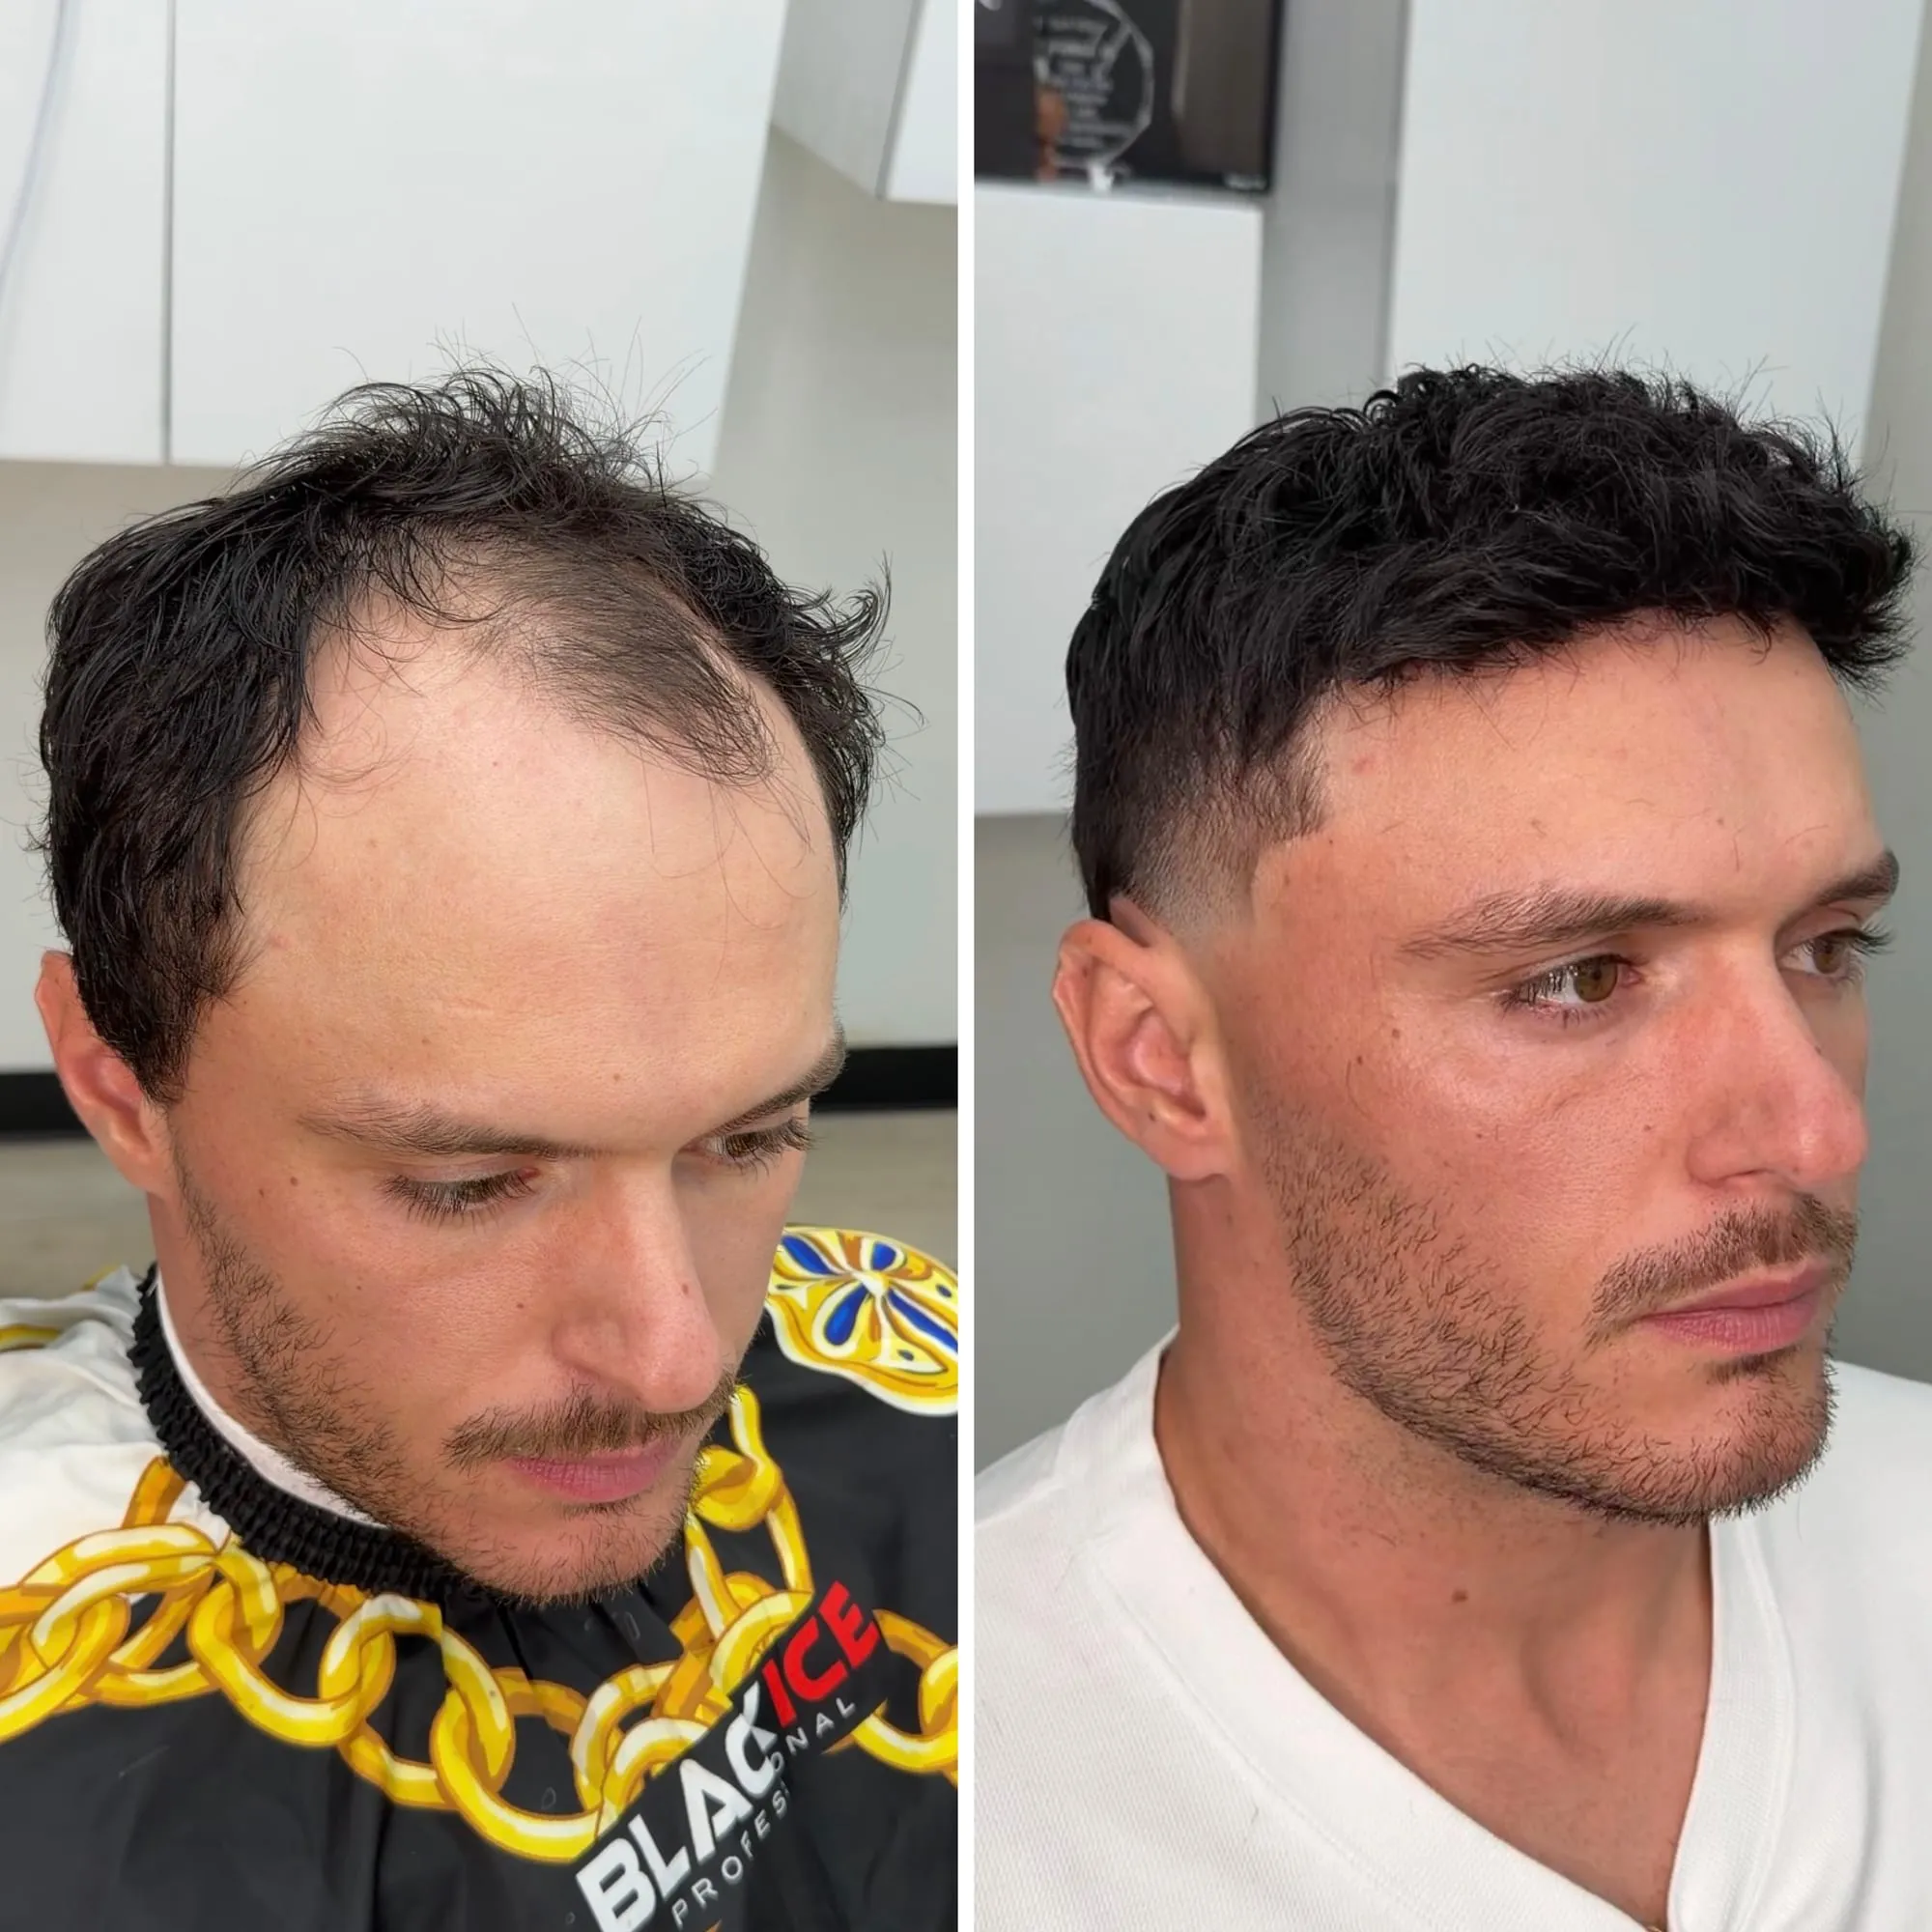
This is what it looks like.
A real client from our chair, photographed before and after his hair system was installed and cut in.
Questions, answered.
Can I really reattach my own hair system at home?
Yes, most men can once they have been coached through it. The routine is remove, clean, prep, apply adhesive, and place the unit in the same position each time. It takes a handful of cycles to get smooth, and prep is what makes or breaks the result. We teach it hands on before you do it alone.
How long does a reattachment take?
A confident home reattachment often runs about thirty to sixty minutes once the skill is there. A studio reattachment takes a scheduled appointment because it includes a deep clean, a scalp check, and a trained eye on the bond and hairline, not just the reattachment itself.
Should I still come to the studio if I reattach at home?
We recommend it on a regular cadence. Home reattachments keep the unit fresh between visits, but a studio appointment resets the baseline with a full clean, catches early base wear and scalp irritation, and re establishes your exact front position so your home cycles stay accurate.
Why does my home reattachment keep lifting?
Almost always prep, not the adhesive. The usual causes are a scalp that was not fully dry and oil free, old residue left on the base or skin, or too much product. Clean thoroughly, dry completely, use a controlled amount of adhesive, and set the front first against a steady reference.
Is reattaching at home worse for my hair or scalp?
Not when it is done correctly. Problems come from rushed cleaning that leaves adhesive on the scalp or from never letting the skin rest, not from home reattachment itself. Clean fully every cycle and keep your studio visits, and a home routine is fine for most people. Bring any persistent irritation to a physician.
Keep reading
Related guides.
Reattachment Interval
Most men reattach a hair system every two to four weeks. What sets your number: adhesive class, scalp oil, sweat, and climate. How we find yours.
Hair System Maintenance
How to keep a hair system clean, secure, and natural: your at home routine, the maintenance schedule, and what a studio visit covers.
Removing a System
How to remove a hair system without damaging your hair: the right solvent, the technique, and why studio removal protects your scalp and the unit.
Attachment Methods
Tape, bonding, and clip attachment for hair systems compared by hold, comfort, and how they suit your routine. How to attach a hair system.